
I passed by Gail Town a little while ago. It's a little while after sundown there (AND in our dining room!), and I really enjoyed its appearance... in the shadows, but still accented by some warm lights from the hall night light. Gail Town is growing! Tomorrow, we're having a very small family New Year's Eve gathering. I plan on just moving the structures as close as possible, to the end of the table... and placing the foods and drinks, buffet-style, on the table. We'll serve ourselves and then find seats in various gathering-spots. It'll be fun. And it'll be fun to share Gail Town.
I just finished enjoying a lazy rest on the couch (glass of wine, feet up, laying my head back and day-dreaming) and I made my first "mindful" visit to the gazebo. May I share it?
My first sensations are of being already seated... at the rear bench, facing the entry. To my left, a mariachi guitar, sombrero, and posters. To my right, a vase of flowers, and bread and fruit. Some of my favorite things. Looking around, I appreciate the festive luminaria lanterns. Beautiful.
My standard process for mindful excursions like this... explore and experience each sense, enjoy the moment, and if it seems right, contemplate any emerging issues.
Sooooooooooooooooooo...
Sight, taste, smell, sound, touch (order them any way you like).
The sights are of my little town... so safe, familiar, pretty, comfortable. I can let my eyes rove the buildings and remember the fun of building and later visiting them. Closer to me, I can look at the gazebo. There are refreshments ready. A guitar if I (or somebody else) feels like playing. What a beautiful little gazebo, in a peaceful little town, and I am nestled in its embrace.
The tastes? Only my warm tastebuds contemplating the nearby refreshments.... oh, and maybe a bit of idle lip-licking, enjoying the last remnants of the infamous cherry-chapstick...
The smells? The always-there smells of the desert/prairie... bittersweet aromas of the sage bushes, the sunny-dusty panhandle winds. The wavering smells... of the gazebo's fresh paint, the bread/fruits, the drying spices and herbs from the chukka drying rack...
The sounds? Maybe some mechanical clinks or taps from the cycle shop. Maybe Nature's evening sounds... night winds, gentle hoots from pygmy owls. Maybe some cooking noises from the chukka... sizzling chorizo/maize filling for travel-breads. Ooooooh, add that to smells!
Touch. I like to go foot-to-head. My feet, in sneakers, are planted on the wooden floor. Legs at ease. Butt comfortably resting on the cool wooden bench. Hands on my thighs, fingers gently interlaced. Back resting against the railing. Gentle winds ruffling my hair. Eyes closing, enjoying...
My thoughts?
Time to start looking to 2018. I've had a lot of challenges, crises, tragedies, blessings, gifts, distractions...
I bet you have too.
I will be devoting this next week to making some lists, setting some goals, writing some affirmations. Yeah, January 1 is a somewhat arbitrary reckoning point, but...
As my big sister Marie says... the year, the planet's cosmic ellipse, is important, from the intimate and subjective to the public and scientific. Even critters' lives follow the ellipse, the seasons, the year, the renewal, the re-doing, the re-starting. The New Year, for me. Now. I had to blink and think and just sit back. I never put it all together just that way.
But I did, and I was mindful about that, tonight, in the gazebo.
AHHHHHHHHHH!
Eyes open, back to "real life". Enriched!
Thank you all, and... HAPPY NEW YEAR!!!!
Saturday, December 30, 2017
Thursday, December 28, 2017
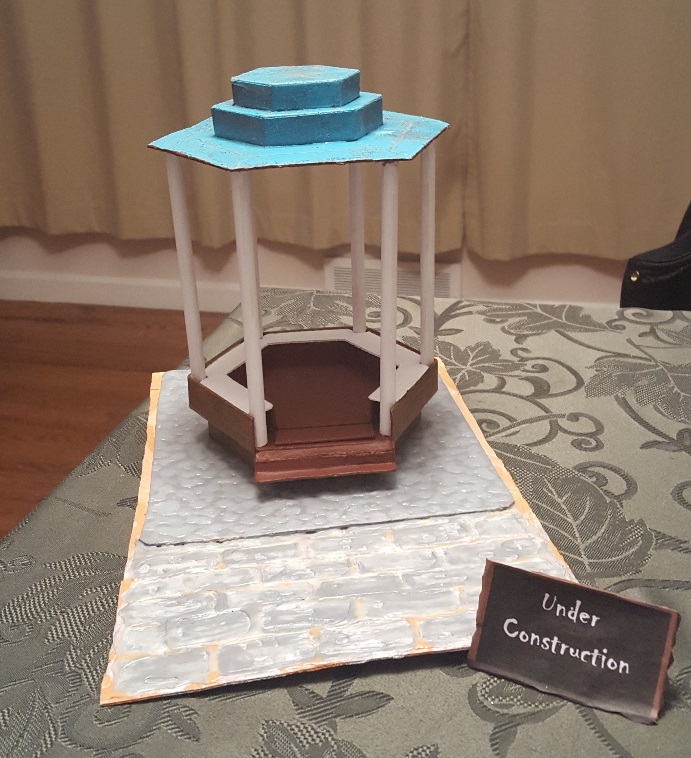
Gazebo is finished... for now!
Nadia, thanks for the great idea about the table... a newspaper, of course. Gives the place a look of activity and also allowed me to introduce the name of the long-running newspaper nearest to Gail Town, which is the Amarillo Globe-Times. Very nice.
I glued everything down, finally, since I'm done with the structure (for now, until/unless I think of something more to add).
Gazebo is finito. :)
And finally, a picture of Gail Town, to date, in its natural habitat... our dining room table!
And now to decide what's next. Suggestions welcomed!


I glued everything down, finally, since I'm done with the structure (for now, until/unless I think of something more to add).
Gazebo is finito. :)
And finally, a picture of Gail Town, to date, in its natural habitat... our dining room table!
And now to decide what's next. Suggestions welcomed!


Tuesday, December 26, 2017
Gazebo Table
I added a few more touches to the Gazebo, including some blankets and mariachi posters.
The little hexagonal table will be in the center. I just fashioned it out of light cardboard, painted it, and "glazed" it to look like Spanish tile.
I'm thinking about what to place on it. Drinks? Food? Postcards?
Ideas?
I won't glue the table in until I have stuff placed on it.


The little hexagonal table will be in the center. I just fashioned it out of light cardboard, painted it, and "glazed" it to look like Spanish tile.
I'm thinking about what to place on it. Drinks? Food? Postcards?
Ideas?
I won't glue the table in until I have stuff placed on it.


Thursday, December 21, 2017
The Plaza goes SQUARE!
As I was admiring Gail-Town-in-progress, it occurred to me that the gazebo is really going to be the central, unifying structure, and as such, a more square shaped plaza is more pleasing (and more traditional) than the long rectangular plaza, soooooooooooooooo... I whacked the paver section off off! I'll use 'em someplace else, I'm sure.
Much better!!!!!!!!!!!!!!!!!


Much better!!!!!!!!!!!!!!!!!


Wednesday, December 20, 2017
Gazebo Decor
Rosie, the weather vane is still percolating in my mind.
Meanwhile...
Sometimes things happen fast. I had a day to myslf, so I did a bunch of stuff for gazebo decor.
Three trays... fruits, a flower in a vase, and a big loaf of French bread. The trays are paper, colored with pencils, and the fruit, bread, and flowers are Sculpey (the moldable, bakeable clay stuff you can buy just about anywhere). The vase is a clear plastic straw, cut and then filled halfway with clear Elmer's Glue to simulate water... love that stuff.
The little lights are decorative "luminarias"... common out West... little paper bags with candles inside. These are made of paper, colored with magic markers and pencils, cut, folded, glued down.
The guitar and sombrero... again, drawn with magic markers and pencils, on cardboard, cut out, glued in place.
The whiskey (Tequila) jug is also Sculpey, painted with acrylics.
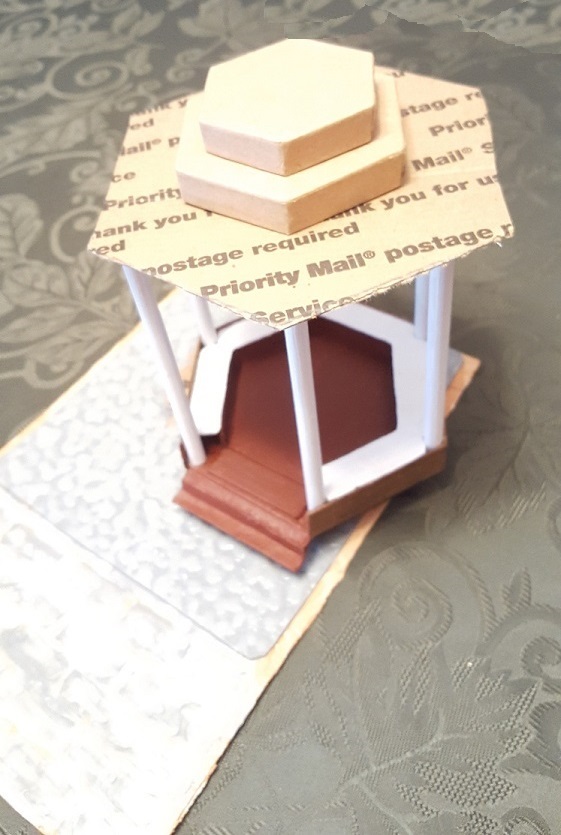
I glued the gazebo down onto the cobblestone foundation, but I left the roof off for ease of adding whatever additional decor I dream up.
If you'd like any additional directions on the individual projects, just message me. :)


Meanwhile...
Sometimes things happen fast. I had a day to myslf, so I did a bunch of stuff for gazebo decor.
Three trays... fruits, a flower in a vase, and a big loaf of French bread. The trays are paper, colored with pencils, and the fruit, bread, and flowers are Sculpey (the moldable, bakeable clay stuff you can buy just about anywhere). The vase is a clear plastic straw, cut and then filled halfway with clear Elmer's Glue to simulate water... love that stuff.
The little lights are decorative "luminarias"... common out West... little paper bags with candles inside. These are made of paper, colored with magic markers and pencils, cut, folded, glued down.
The guitar and sombrero... again, drawn with magic markers and pencils, on cardboard, cut out, glued in place.
The whiskey (Tequila) jug is also Sculpey, painted with acrylics.
I glued the gazebo down onto the cobblestone foundation, but I left the roof off for ease of adding whatever additional decor I dream up.
If you'd like any additional directions on the individual projects, just message me. :)


Tuesday, December 19, 2017
Weather Vane... thanks, Rosie!
Rosie, THANK YOUUUUUUUUUUUUUUUUUU!!!!!!!!!!!!!!
A weather vane is a great idea for the gazebo roof!
I'll try to come up with something that really adds to and defines my little town, as you suggested.
I am so grateful.
What an exciting idea... I'm researching and thinking.
SPEAKING OF MINDFULNESS/MEDITATION/ETC., I was completely at peace and relaxed today at a stressful meeting. Beforehand, I had "toured" and contemplated my emerging/developing gazebo. I sat on the bench, absorbed the atmosphere, called the little dog over to me for head-rubs and belly-scratches...
I left "myself" (in part) there, at peace, smiling... as the "rest of me" went to the meeting and did a great job!
Thank you, Gail Town.
Thank you, Rosie!
Roof Finished!
This got finished faster than I thought!
I painted the roof's underside brown and textured it with a toothpick to look like slats... or something. I want mood, not necessarily specificity...
The top... I base-coated it with a dull copper spray paint, then sprayed a top-coat of turquoise to simulate oxidization, imitating patterns I found online concerning antique/vintage/distressed copper rooves and cupolas. . I had the paints let over from a previous craft project, and it just kind of fell together. I won't glue it down yet... still lots of stuff to do inside the gazebo.


Monday, December 18, 2017
The Roof Begins...
I have solved the roof question.
I'll be using more of the little hexagonal papier mache box tops. If I'd known I'd be making so much use of these items, I'd have shown them sooner. Here's the original set I bought. I have mixed and matched the tops to form the base and now the roof. The photos show the idea. It strikes me that these sets (which come in squares, circles, triangle, hearts, stars, and probably more shapes) could be used for various structures or other projects... not just nesting boxes.
I cut a hexagonal roof base and then inverted the two smallest tops on it.
Next I'll get the roof glued together... still considering paint/materials. Shingles? What kind? Or tiles? Or just painted?


Saturday, December 16, 2017
The Gazebo... supporting poles (floor to roof)
Back to the gazebo...
The poles!
I bought a 36 inch dowel and cut it into six 6-inch pieces to serve as the six poles linking my hexagonal base with the roof... why hexagon? That just happened to be the shape of the original papier mache box lids that made the base! Turns out dowels usually come in 3 foot lengths (at Michael's, anyway) so I picked a diameter that worked, and dividing 36 by 6 was easiest, AND it made for a nice height, so... there ya go.
I had known I'd need poles, so I left some spaces at the sectional corners. It worked out, and the poles fit. I painted them white in two stages, to make handling and gluing easy.
I like it!
I'm still not gluing the gazebo down.
It was only slightly tricky to get the poles to glue upright at the same angles, but it's okay... close enough.
I have no idea what the roof will be.
This is how we do things in Gail Town. One inspiration at a time...


Thursday, December 14, 2017
Orchids!
While I'm continuing to work on the Plaza/Gazebo, I plan to loop back and spotlight some décor details from past projects (completed before I even began this blog).
This time, I want to take a closer look at the art gallery's front porch BENCH and SHELF, and a pot of orchids!
Here's a look at the front of the art gallery. Quick background... the gallery itself was made of four walls, a ceiling, and windows all constructed of wooden craft pieces of the sort you can buy at a local craft store. The windows are clear plastic pieces cut from packages or wrappers and glued in between wood or paper. That's the case with the front window of the gallery.


Back to the front porch. There's a wide shot, a closer one, and third, a close-up of the bench and shelf.
The bench was made of bent/shaped cardboard which was painted with acrylic. Then I used a fine magic marker to "make planks" and "nails". The shelf behind the bench is just another piece of wood glued to the front wall and painted. On it, I placed a sign (in Spanish) about hours of business.
My favorite item on or around the bench or shelf is the pot of "orchids". It's actually an inverted small toothpaste tube cap, with some real grass stems glued in, and some real dirt glued in around them. The orchid "blossoms" are just made of tiny paper structures (rolled up and trimmed and colored with magic markers). I then glued them on to the grass. Voila! A pot of orchids!
Once again let me say... if you don't have time/motivation/materials/whatever to make all this stuff from scratch, you can find plenty of ready-to-go stuff online, or at the hobby store. You can use it as is, or paint/personalize it... the important thing is to make a mindfulness-embracing little world for yourself!
Tuesday, December 12, 2017


The seat sectional is finally glued in, but... what a nightmare!
It was so hard to get it glued in and level, and the glue kept getting everywhere and corroding the paint, and then after holding the sectional in place until it set, my fingers also set and got stuck to the seats and yanked the seats right out, and...I had to add cardboard braces and... after HOURS (or so it seemed) it got done. In hindsight, I should have put something (like cotton balls, or some match boxes, or little spools, or SOMETHING) under the seats to hold them steady as the glue (applied just around the top edges) set.
I got so frustrated that just for fun, I found some pre-fab gazebo kits!
https://www.bing.com/search?q=dollhouse%20miniature%20%20gazebo&qs=n&form=QBRE&sp=-1&pq=dollhouse%20miniature%20gazebo&sc=3-26&sk=&cvid=79AB2D3F21E64BC78641A8FB4145FF23
I will repeat something I've said before... you can make your own mindfulness miniatures from scratch, or you can buy 'em (kits or finished)... the only REQUIREMENT is that it be your little private world. You put it together for YOU, and then you visit it mindfully as you go about your busy day!


Saturday, December 9, 2017

Thursday, December 7, 2017
I'm taking up where I left off a few posts down... with the gazebo scene. Remember the two little papier mache box tops? I glued them together for my gazebo shape, painted the structure with brown acrylic paint, then used a pencil to make light scratch marks to represent wooden planks and nails for the exterior and floor and steps. Oh, and I cut out the front "entryway" to the gazebo box and used that material to make the steps.
I've temporarily placed the gazebo on the terrain/plaza/set to show where it will eventually be glued, after I have installed all the furniture, décor, etc.

I've temporarily placed the gazebo on the terrain/plaza/set to show where it will eventually be glued, after I have installed all the furniture, décor, etc.

Wednesday, December 6, 2017
Tuesday, December 5, 2017
Speaking of parrots, I'm a member of a couple of online communities, including a huge and active parrot-lovers' community. I decided to share my miniatures/mindfulness hobby with them, and the response was wonderful! Some people are already active with miniatures, and many enjoyed learning about the ideas. Who knows, maybe they'll even try their hands at miniatures someday.
Here's the thread. You don't need to be a member or any such thing just to read...
http://www.parrotforums.com/off-topic/72163-miniatures-tiny-models-little-worlds-dollhouses.html
Here's the thread. You don't need to be a member or any such thing just to read...
http://www.parrotforums.com/off-topic/72163-miniatures-tiny-models-little-worlds-dollhouses.html
Sunday, December 3, 2017
Budgiraptor
("Budgie-raptor")
I've had a pet parrot for 33 years now, so I wanted a companion bird for Gail Town... I wanted him to have full access to the place, just like the little red mutt who's relaxing by the front door of the cycle shop. But parrots are prey animals, and I didn't want my little friend to have to worry about eagles, falcons, hawks or owls. Yes, that's how serious and literal I am about my miniature denizens! So I had to invent a bird that could take care of itself

It's part Budgerigar and part hawk... a Budgiraptor. Here he is in his role as ambassador to Gail Town, proprietarily perched on the sign.


I love him! In my last post, I was emphasizing the extreme importance of making your mindful miniatures personal, meaningful, and evocative. This little guy will really help me out.
Saturday, December 2, 2017
I've spent a couple of days thinking and planning the Gazebo.
I'm just not getting it right, but I'll take my time. Here's why.
As I mentioned in my very first post (manifesto!), it's critical to choose structures, designs, and special touches that are very special to YOU. Not just pieces that are pretty... or impressive... or consistent with a theme or décor style or timeframe... or easily do-able.
The scene, and everything in it needs to reach out to YOU in a personal and very meaningful way. When you're out and about, and needing a few moments' retreat and mindful refreshment in your miniature environment, authenticity and personal meaning is absolutely necessary to help you make maximum use of the miniature and everything in and around it.
This can be a new concept! You're not looking for perfect vintage reproductions... or exact proportions... or classic color schemes. It's all about YOU. There are plenty of times and places to be focused on others and their welfare or concerns. But this is about you.
As you construct your miniature, you need to be constantly on the watch, asking yourself how to make things just right for yourself. What's your favorite color? How about making that pillow that very color? Are you looking for a chair or seat? Don't stop until you make one or find one that would be your perfect comfort. Are you setting out some snacks? Now is not the time to count calories!
Speaking of snacks... in my Gallery, on the red table, you'll see a fast-food bag, a drink, and some napkins. You'll never guess, so I'll just tell you. That's a bag of nachos from my favorite taco stand way back in New Mexico... the drink? It's a Coke... the real thing. See the little water drops rolling down the Styrofoam?
Construction notes. I made it all out of paper, using regular glue. The napkins are cut out of actual fast-food napkins.
It matters. A good visualization or meditation or guided imagery journey makes use of all your senses. That bag of nachos gets very real to me. Mindfulness is in the bag, baby.
Subscribe to:
Posts (Atom)